In Part 1 of my bedroom makeover I evaluated my targets for decorating, and in Part 2 I renovated my first new piece of furniture. These were small steps compared to the creation of my wardrobe, which was a long but rewarding process.
As I said in Part 1, I wanted a much bigger space for storing my clothing, shoes and accessories. Clothes are very important to me, so having enough space to store and access them easily was a massive priority. As usual, I went on a search for inspiration before determining my own plans. Here are some wardrobe faves that I found on Pinterest and various blogs:

Open rails are the first thing that appealed to me when browsing clothes storage ideas. Some people find it looks too shop-like, but I feel that it opens up a room, PLUS you can display your pretty pieces for everyone to see.

The colour palette of this room is very dark, which I don't usually go for, but the organisation is supreme. P.S. look at all of the Studio Ghibli toys on the top shelf! Too cute.

I think that this wardrobe is my ultimate favourite. The glass sides give it a very spacious and open feel.

This fitted setup has a very Ikea PAX-like look to it.

This fitted setup has a very Ikea PAX-like look to it.

I love how unique this wardrobe is, the double arch is very sleek. It greatly inspired me to go DIY on my own clothing storage.

Another open rail look with inbuilt shelving...I adore the monochrome rug!

I love the symmetry of this wardrobe and its composition with the bed. The country chic style is very light and airy. Plus aren't those oval windows gorgeous?
After much research, I concluded that open rails and the fitted look appealed to me most. The issue was figuring out how I could have a wall-length wardrobe when I also needed the space for my desk, a bed and general storage. Some Pinteresting later and...

...this!
I was enlightened by the joys of what is known as a murphy bed (or simply a wall bed). I don't know why I didn't think of it before, as my Grandma has one in her spare room which I always found fascinating as a child.
These are completely genius because they save you a great amount of floor space, but can also easily be disguised as a cupboard, as demonstrated by this green one. I love the metal details and the wooden panelling - it has a real barnyard door look to it.
I figured that my best option in terms of space and aesthetics was to integrate the bed with the wardrobe. I scoured eBay, Gumtree, Preloved; the usual, and eventually came to the realisation that sourcing a bed/wardrobe combo which was both to my taste and affordable was unrealistic - DIY was the only way forward. I hit a brick wall, but it seems that eBay always have something weird and wonderful to spring on you.

That's where I found this 19th century fireplace surround. I could immediately picture it at the front of a very grand, unique wardrobe. It was dirty and in need of some TLC, but boy did it have potential. I began sketching up some ideas, and could really see it working in my space. It was also almost EXACTLY the length of my bedroom wall too - fate! SOLD for £108 after a very intense bidding war, and I daresay it was worth every penny.
Once it arrived, I starting taking more precise measurements and working on a 'final' plan. I had also purchased a massive amount of MDF shelving on eBay, with the intent of including it in the structure. Here's my design:

Apologies for the bad image quality! But you get a basic idea. The wall bed is central to the arch, and is boxed in (with doors on the front to hide it, which aren't shown in the sketch). There are then two open rails on both the left and right hand side, plenty of room for hanging clothes. The rails join from the box to the side of the pillars. The pillars then have pigeon holes either side of them, which make up for the rest of the space on the wall, and of course provide more storage. I marked out exact measurements across the diagram in order to make the process of assembling it easier when the time came.
Day 1 - The Big Clean.

These are completely genius because they save you a great amount of floor space, but can also easily be disguised as a cupboard, as demonstrated by this green one. I love the metal details and the wooden panelling - it has a real barnyard door look to it.
I figured that my best option in terms of space and aesthetics was to integrate the bed with the wardrobe. I scoured eBay, Gumtree, Preloved; the usual, and eventually came to the realisation that sourcing a bed/wardrobe combo which was both to my taste and affordable was unrealistic - DIY was the only way forward. I hit a brick wall, but it seems that eBay always have something weird and wonderful to spring on you.

If in DIY doubt, browse the Architectual Antiques category. The world is your oyster!
That's where I found this 19th century fireplace surround. I could immediately picture it at the front of a very grand, unique wardrobe. It was dirty and in need of some TLC, but boy did it have potential. I began sketching up some ideas, and could really see it working in my space. It was also almost EXACTLY the length of my bedroom wall too - fate! SOLD for £108 after a very intense bidding war, and I daresay it was worth every penny.
Once it arrived, I starting taking more precise measurements and working on a 'final' plan. I had also purchased a massive amount of MDF shelving on eBay, with the intent of including it in the structure. Here's my design:

Apologies for the bad image quality! But you get a basic idea. The wall bed is central to the arch, and is boxed in (with doors on the front to hide it, which aren't shown in the sketch). There are then two open rails on both the left and right hand side, plenty of room for hanging clothes. The rails join from the box to the side of the pillars. The pillars then have pigeon holes either side of them, which make up for the rest of the space on the wall, and of course provide more storage. I marked out exact measurements across the diagram in order to make the process of assembling it easier when the time came.
Day 1 - The Big Clean.

Before I could start materialising my plan, I had to clean them up. They were absolutely filthy, covered in soot and dirt.

They appeared to be painted in a sort of black wash, either that or they were seeeriously caked in soot from over many years. Either way, I wanted to bring the wood back to its former glory. I simply used a little fairy liquid in water, a sponge and a scrubbing brush.

After a wash down - not much of a noticable difference as you can see.

Sanding them down was the next stage, which really cleaned them up a treat. I started doing it by hand but this proved to take too much effort, so I resorted to a machine belt sander which worked miracles.
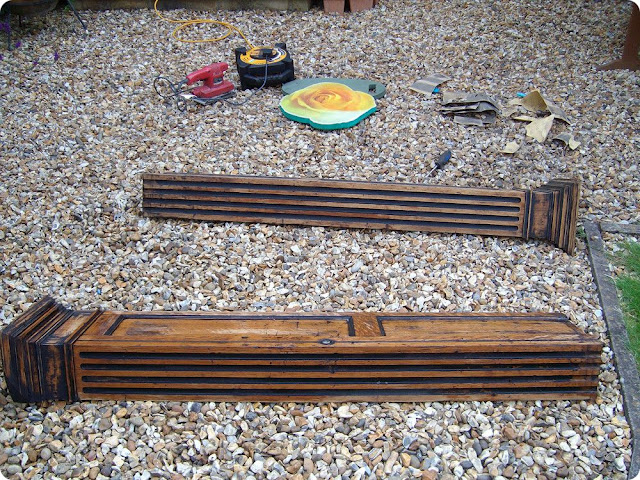
The natural colour of the wood came out beautifully, but I needed the archway to be uniform with the MDF pigeon holes, and hence decided to paint it in Clunch to match my plan chest.

I loved the contrast of the natural wood and the black. The grain came out really nicely, I think it must be made from oak or another hardwood.


Once the columns were cleaned up nicely, it was time to give the archway a good scrub.

I noticed that unfortunately a panel at one of the bottom ends was missing, but figured that it would be easy enough to replicate in scrap wood and paint over.

This is the left end which still had the original panel. As you can see the design is fairly simple - I was confident that I could copy it with the right size wood.

Even the carvings were caked in filth. It was amazing to think that I was about to scrub away 200 years of grime...it made me reflect on its history. Which grand house was this surround situated in? Who enjoyed sitting around it when it housed a roaring fire?

What a different a scrubbing brush and some fairy liquid made! The carved detailing looked more beautiful then ever. I felt (I still feel) so lucky to own such a stunning piece of history.

Under-panelling before.

Under-panelling detail after. Ohh so pretty!

After the deep clean, it all its glory.

A close-up of the front of the archway.

I was fortunate enough to have great weather for the drying process.
Day 2 - Priming.

Now it was time to apply primer to the archway. I figured it would be easier to paint the pieces flat rather than when assembled. Once again I just used Dulux Primer and Undercoat.

I almost felt a bit sad painting back over my hard work, but I knew that it would be worth it in the end.

The two pillars after one coat of primer.

I didn't cover it too thoroughly as I loved how the dark grain came through the paint.

I then began paiting the archway. This was so so time consuming with all of the little details.

Even after one coat, it really brought out the details. I love how intricate the corner designs are.

A close-up of the carving detail along the bottom rim of the arch.

One coat finished! Looking fresh.
Day 3 - Clunching.

On day three I was ready to crack out the Clunch. After one coat on the pillars I decided that I liked the shabby-chic, weathered look, and hence didn't apply a further second coat.

As you can see, the colour isn't quite solid and the dark underneath is peeking through around the joints. I felt that this really retained its original character.
Day 4 and Beyond - Transformers.

I sort of lost track of time and general awareness (including photo-taking) after the pillars were given their final coat. Before I could paint the archway, my awesomecool super-skilled DIY Uncle offered to help me assemble the wardrobe, which of course was an offer I couldn't refuse. We managed to put the whole thing up in less than a day, which I was both amazed by and incredibly grateful for.
As I said I got a bit carried away and forgot to take photos, but if you're intrigued by how it was assembled on a technical level, it was actually quite straightforward. First of all we put together the pigeon hole ends - upright rectangles with added shelves. We measured the height of the archway, and took this away from the pigeon hole structure height to work out what length the pillars needed to be. They were a bit too short, so we added extra MDF pedestals at the bottom. We then fixed the pillars to the sides of the pigeon holes. The archway subsequently sat on top of the two pillars, and was further joined to the structure. The whole thing is held to the wall using hidden batons and brackets. The hidden shelves at the back were later added.
Luckily I painted the walls in my room a week beforehand. If you remember in Part 1, I wanted a change from my Laura Ashley Duck Egg Blue paint, and so decided on Dulux's White Chiffon. It was the off-white tone I desired for a more neutral space.
The days then seemed to merge into each other as I painted the pigeon holes and the second coat of the archway. I watched all of the Transformers movies among many others during the process. I thought it would neeeever end!
As you can see, I also acquired a wall bed. It cost me a very reasonable sum of £70 second-hand on Gumtree, rather than paying the full £400 odd quid new.

I learnt lessons along the way, such as being patient and putting down masking tape.

Or you get this *sigh*.

My Uncle came up with the genius idea of putting hidden shelves at the back of the wardrobe so as not to waste space. HELLO shoe storage!

I have many shoes, so was pretty chuffed at the unexpected addition. I had some nice trim left over from the MDF bundle I bought on eBay, so thought I'd put it to good use and neaten up the edges.

That's better!

Time to Clunch up these babies, and this time WITH masking tape.

The next step was preparing the sides of the box to go around the bed. I quite simply got the pieces cut to size at Homebase, and then once again got painting with primer and Clunch.

While I was at it, I cut the wooden poles to size for the clothes rails. These are simply broom handles, which I bought from eBay for £1 each plus postage. What a pal.

The result of a hard day's work under the gazebo. I used string to suspend the poles in order to paint them on a 360% angle. Once they were touch-dry I took them down to paint the ends.

THE RESULT. I think it nearly took me as long to make this post as it did to make the wardrobe. As you can see it's currently in a doorless state, as I was still sourcing them at the time. I have since acquired the perfect pair from eBay, which I'll feature in a separate post.
The process of imaging and constructing this piece of furniture was incredibly long, but also very rewarding. It goes to show that you can recycle just about anything with a bit of imagination.
The best thing about this is that some long-term storage problems for me are finally sorted. Having my bed on my wall made all the difference to my general floor space. I now have room for ALL of my clothes! My pigeon holes are full of books and magazines which were otherwise in piles.
Mission successful! If you're wondering what I ever did about my desk, check out Part 4 of The Extreme Bedroom Makeover.

They appeared to be painted in a sort of black wash, either that or they were seeeriously caked in soot from over many years. Either way, I wanted to bring the wood back to its former glory. I simply used a little fairy liquid in water, a sponge and a scrubbing brush.

After a wash down - not much of a noticable difference as you can see.

Sanding them down was the next stage, which really cleaned them up a treat. I started doing it by hand but this proved to take too much effort, so I resorted to a machine belt sander which worked miracles.

The natural colour of the wood came out beautifully, but I needed the archway to be uniform with the MDF pigeon holes, and hence decided to paint it in Clunch to match my plan chest.

I loved the contrast of the natural wood and the black. The grain came out really nicely, I think it must be made from oak or another hardwood.

The ripples in the wood were beautiful.

Once the columns were cleaned up nicely, it was time to give the archway a good scrub.

I noticed that unfortunately a panel at one of the bottom ends was missing, but figured that it would be easy enough to replicate in scrap wood and paint over.

This is the left end which still had the original panel. As you can see the design is fairly simple - I was confident that I could copy it with the right size wood.

Even the carvings were caked in filth. It was amazing to think that I was about to scrub away 200 years of grime...it made me reflect on its history. Which grand house was this surround situated in? Who enjoyed sitting around it when it housed a roaring fire?

What a different a scrubbing brush and some fairy liquid made! The carved detailing looked more beautiful then ever. I felt (I still feel) so lucky to own such a stunning piece of history.

Under-panelling before.

Under-panelling detail after. Ohh so pretty!

After the deep clean, it all its glory.

A close-up of the front of the archway.

I was fortunate enough to have great weather for the drying process.
Day 2 - Priming.

Now it was time to apply primer to the archway. I figured it would be easier to paint the pieces flat rather than when assembled. Once again I just used Dulux Primer and Undercoat.

I almost felt a bit sad painting back over my hard work, but I knew that it would be worth it in the end.

The two pillars after one coat of primer.

I didn't cover it too thoroughly as I loved how the dark grain came through the paint.

I then began paiting the archway. This was so so time consuming with all of the little details.

Even after one coat, it really brought out the details. I love how intricate the corner designs are.

A close-up of the carving detail along the bottom rim of the arch.

One coat finished! Looking fresh.
Day 3 - Clunching.

On day three I was ready to crack out the Clunch. After one coat on the pillars I decided that I liked the shabby-chic, weathered look, and hence didn't apply a further second coat.

As you can see, the colour isn't quite solid and the dark underneath is peeking through around the joints. I felt that this really retained its original character.
Day 4 and Beyond - Transformers.

I sort of lost track of time and general awareness (including photo-taking) after the pillars were given their final coat. Before I could paint the archway, my awesomecool super-skilled DIY Uncle offered to help me assemble the wardrobe, which of course was an offer I couldn't refuse. We managed to put the whole thing up in less than a day, which I was both amazed by and incredibly grateful for.
As I said I got a bit carried away and forgot to take photos, but if you're intrigued by how it was assembled on a technical level, it was actually quite straightforward. First of all we put together the pigeon hole ends - upright rectangles with added shelves. We measured the height of the archway, and took this away from the pigeon hole structure height to work out what length the pillars needed to be. They were a bit too short, so we added extra MDF pedestals at the bottom. We then fixed the pillars to the sides of the pigeon holes. The archway subsequently sat on top of the two pillars, and was further joined to the structure. The whole thing is held to the wall using hidden batons and brackets. The hidden shelves at the back were later added.
Luckily I painted the walls in my room a week beforehand. If you remember in Part 1, I wanted a change from my Laura Ashley Duck Egg Blue paint, and so decided on Dulux's White Chiffon. It was the off-white tone I desired for a more neutral space.
The days then seemed to merge into each other as I painted the pigeon holes and the second coat of the archway. I watched all of the Transformers movies among many others during the process. I thought it would neeeever end!
As you can see, I also acquired a wall bed. It cost me a very reasonable sum of £70 second-hand on Gumtree, rather than paying the full £400 odd quid new.

I learnt lessons along the way, such as being patient and putting down masking tape.

Or you get this *sigh*.

My Uncle came up with the genius idea of putting hidden shelves at the back of the wardrobe so as not to waste space. HELLO shoe storage!

I have many shoes, so was pretty chuffed at the unexpected addition. I had some nice trim left over from the MDF bundle I bought on eBay, so thought I'd put it to good use and neaten up the edges.

That's better!

Time to Clunch up these babies, and this time WITH masking tape.

The next step was preparing the sides of the box to go around the bed. I quite simply got the pieces cut to size at Homebase, and then once again got painting with primer and Clunch.

While I was at it, I cut the wooden poles to size for the clothes rails. These are simply broom handles, which I bought from eBay for £1 each plus postage. What a pal.

The result of a hard day's work under the gazebo. I used string to suspend the poles in order to paint them on a 360% angle. Once they were touch-dry I took them down to paint the ends.

THE RESULT. I think it nearly took me as long to make this post as it did to make the wardrobe. As you can see it's currently in a doorless state, as I was still sourcing them at the time. I have since acquired the perfect pair from eBay, which I'll feature in a separate post.
The process of imaging and constructing this piece of furniture was incredibly long, but also very rewarding. It goes to show that you can recycle just about anything with a bit of imagination.
The best thing about this is that some long-term storage problems for me are finally sorted. Having my bed on my wall made all the difference to my general floor space. I now have room for ALL of my clothes! My pigeon holes are full of books and magazines which were otherwise in piles.
Mission successful! If you're wondering what I ever did about my desk, check out Part 4 of The Extreme Bedroom Makeover.
No comments:
Post a Comment